AWS has made networking configuration many times simpler over managing your hardware. Anyone now has the power to create a network, but with such power comes a lot of mistakes. One of the challenges comes with load testing internal applications hosted on AWS. This article is a general guide which could help anyone testing internal applications. In the end, we demonstrate launching a RedLine13 load test within AWS private subnet communicating externally through an NAT gateway.
Note: If you are looking to use security groups and no NAT Gateway take a look the easier approach documented in Load Testing an Internal Application using Security Groups.
Table Of Contents
- Key Terms – A quick glossary of the items covered
- Goal – What are we trying to test
- Gathering Information – We need to understand the existing AWS setup
- Just Running Tests – Why we can’t just run a test
- Setting Up Load Test Architecture – Setting up a network for the load tests
- What does our Network look like? – Recap of Load Architecture + Application Architecture
- How to test this setup – Before we run the load test we can confirm
- Running Load Test from RedLine13 – Executing a RedLine13 load test
- Final Architecture and Final Word
Key Terms
Terms that you might not use day to day.
| ELB | Elastic Load Balancer is an Amazon Web Service that sits in front of multiple servers to balance workload |
| Internal ELB | Internal Elastic Load Balancer, same as ELB but only allows internal traffic |
| NAT Gateway | Network address translation gateway. Enables internal EC2 instances to communicate with external resources |
| Security Group | Defines the security rules which can are applied to Load Balancers and EC2 Instances |
| VPC | Virtual Private Cloud which represents a network within AWS |
| Subnet | A VPC is comprised of 1 or more subnets |
| RouteTables | Controls the traffic from a subnet to other endpoints |
| Network ACL | Further traffic management |
| CIDR | A format for specifying an IP range. Classless Inter-Domain Routing. |
Goal
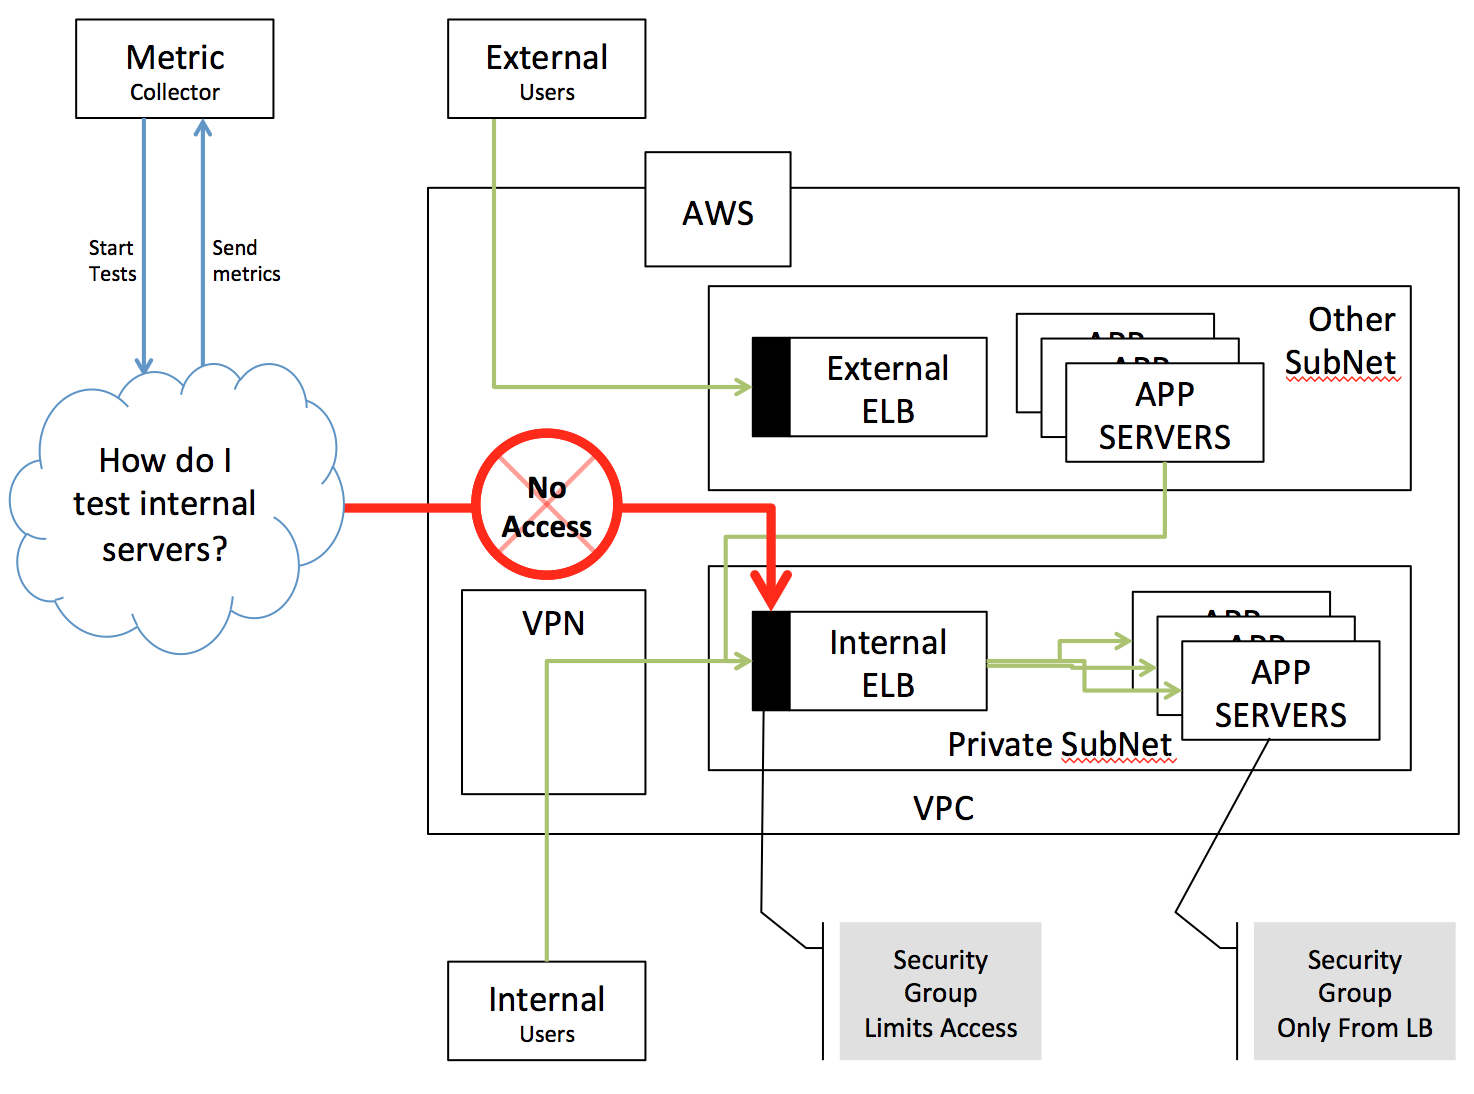
Creating a load test that executes against services only accessible internally, but needing to report metrics to an external system or provider.
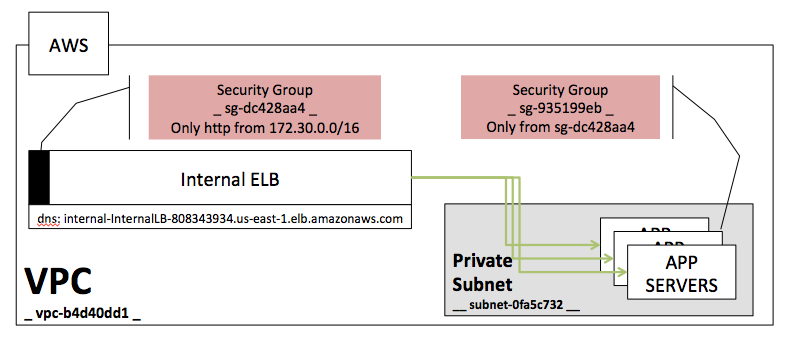
Your application architecture looks perhaps something like the following with the desire to simulate thousands of users while maintaining your security goal of not permitting external traffic to your service.
We will work on understanding the details of the architecture and creating a step by step approach to solving it.
Gathering Information
URLs from the examples below will be for the us-east-1 region.
Step 1. Know your Security Group.
What does your security group allow? What traffic is allowed to access this ELB? Do you have custom Network ACL rules?
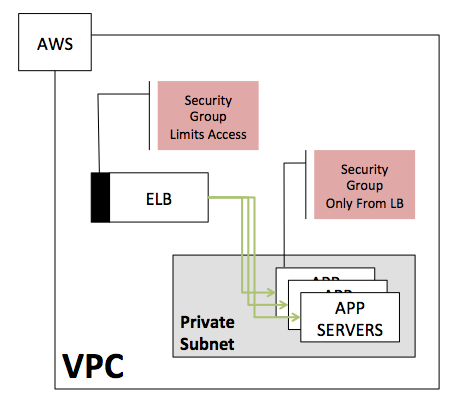
We are looking at the details of the two security groups
a) Security Group for internal servers
- Limits traffic to just the Internal ELB
- Find an internal server, view the Description, Find Security Groups, Select Security Group, View Inbound Rules
- If the source is a security group, it only allows instances to connect with the same security group.
- This one rule only allows our Internal ELB to connect to our servers

b) Security Group for the internal load balancer.
- Find your Internal LB, look at the Security tab, Select Security Group, View Inbound Rules
- Limits traffic to HTTP from the internal VPC or even specific subnets within the VPC
- This example limits the Internal LB to traffic from 172.30.0.0/24, which is the range 172.30.0.0 – 172.30.0.255

We will be dealing with cases where your ELB limits traffic to specific IPs or only traffic coming from a defined subnet. Other possibilities exist, but the key is knowing how they are configured and creating your wiring diagram.
Step 2. Know your VPC and SubNets
Your VPC defines your managed network and represents an internal IP range: VPC-CIDR. Here is a default VPC and its network configuration.
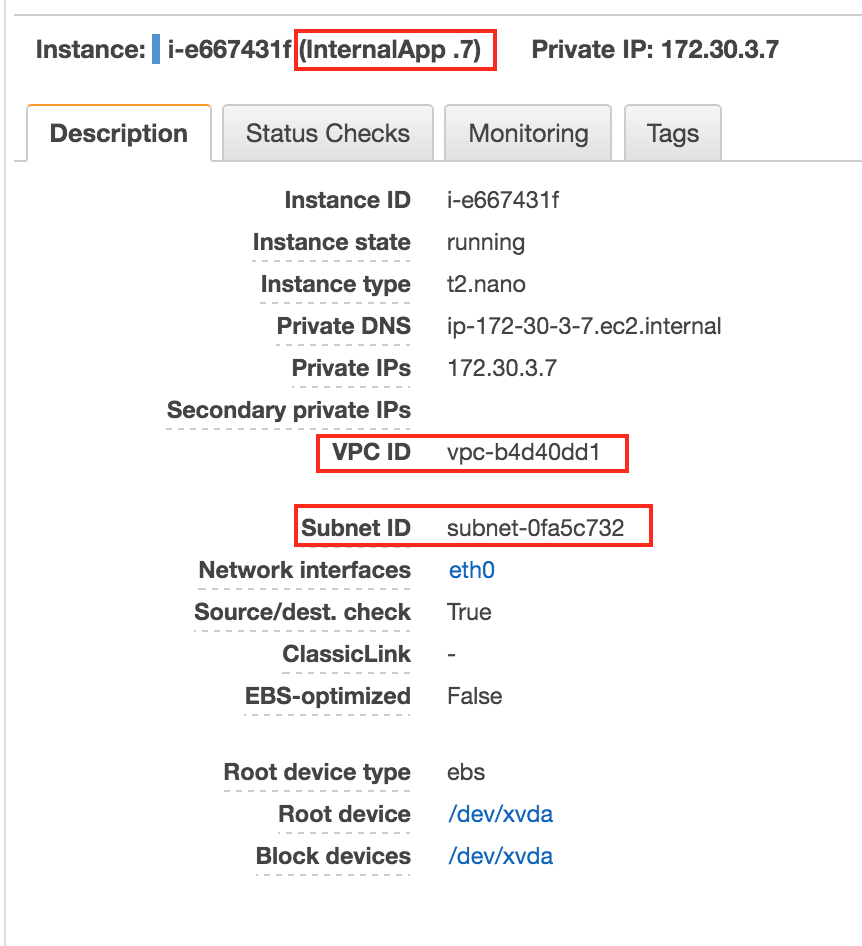
- Find the VPC for which your internal application resides in by looking in the description tab
- You can list all VPCs @ https://console.aws.amazon.com/vpc/home?region=us-east-1#vpcs:
And you can then view your Subnets which take ranges of IPs within your VPC. Notice these are all internal IP addresses.
- Find the Subnet for which your internal application resides in by looking in the description tab
- To list all Subnets, go to https://console.aws.amazon.com/vpc/home?region=us-east-1#subnets:
Step 3. Know your ELB and Application.
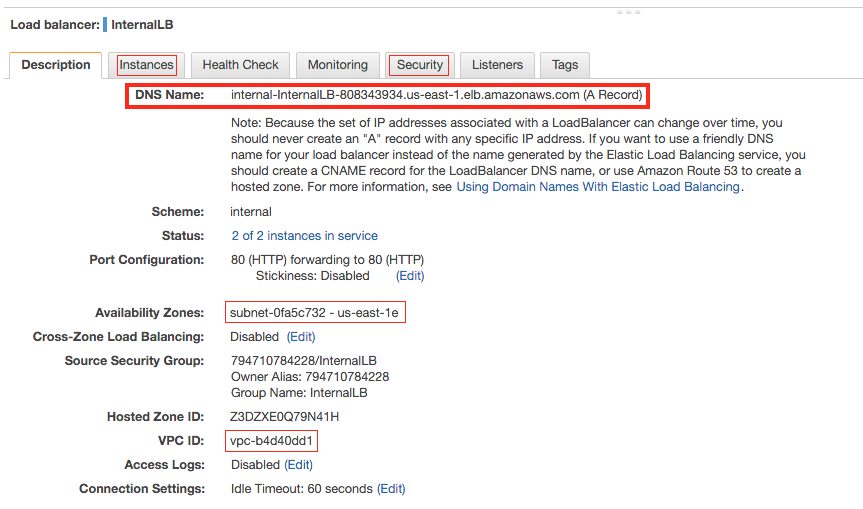
To setup our load agents, we will need to know how your ELB and Applications will be configured. For most, we just need to look into the ELB configuration.
https://console.aws.amazon.com/ec2/v2/home?region=us-east-1#LoadBalancers:
- Select your internal load balancer
- View the Description to find DNS
- Look at the Security Tab to find Security Group
- Use the Instances Tab for determining servers attached and their health
- You can also confirm the VPC and Subnets involved.
Step 4. Fill out the information
We need to gather some of that information from ELB, VPC, SubNets, and Security Groups.
- DNS Name of Internal ELB ________
- Typically the request URL we will be using later
- Example: http://internal-InternalLB-808343934.us-east-1.elb.amazonaws.com
- VPC ELB is launched in _____
- Subnet(s) For Application Instances _____
- Security Group ELB ______
- Rules ________
- Security Group Instances _______
- Rules ________
Step 5. Putting together what we know
So we now have a picture of our Application Architecture and have a sense of where the security and networking rules will apply.
| Need help to build a testing architecture, get in touch. info@redline13.com or start a subscription |
|---|
Just Running Tests
Q: At this point why not just run a load test?
A: If you launch an instance into a VPC it could:
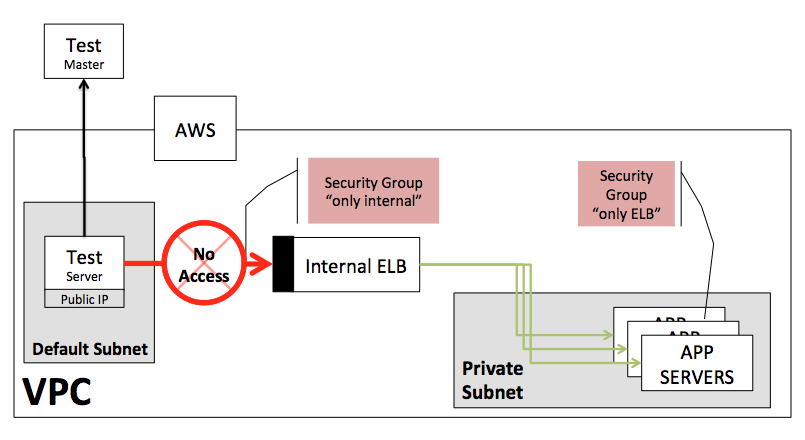
a) Launch with a public IP. In which cases calling http://internal-InternalLB…./ will look like a public IP Address and your Internal ELB rules will block the call. Every time you run an agent, the public IP will change, making it impossible to keep updating the security group rules.
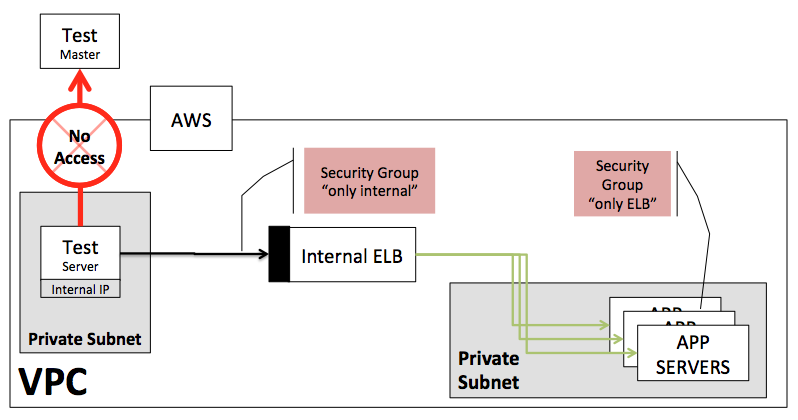
b) Launch with a private instance and only internal IP. These instances by default will not be able to reach https://www.redline13.com and, therefore, will never get a test to run or report metrics to the service.
| Need help to build a testing architecture, get in touch. info@redline13.com or start a subscription |
|---|
Setting up Load Test Architecture
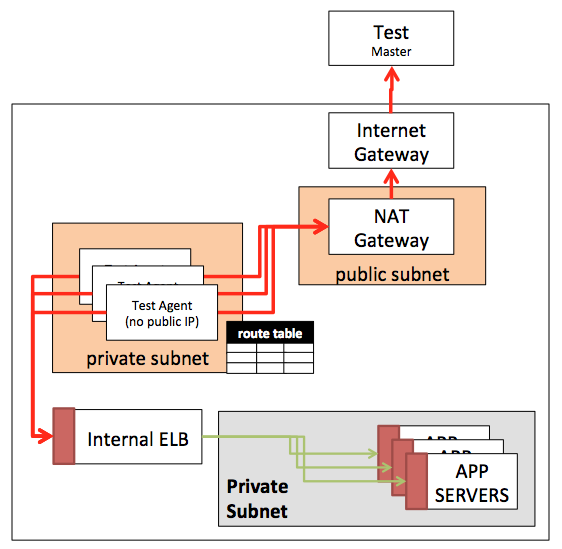
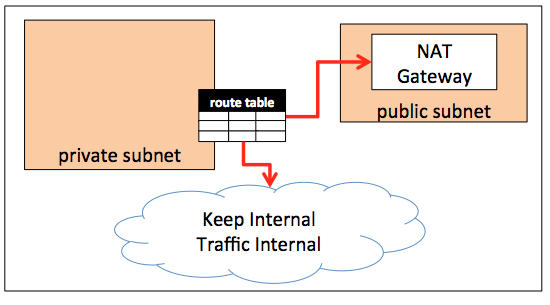
The solution is to run load testing agents within a private subnet that defines a route table to send outgoing traffic through a NAT gateway. The NAT gateway will allow the control of internal and external traffic as desired. It is a recommended approach and will require some configuration. The steps below should help get through the thick of it.
In our final architecture, we will end up with three subnets
A) Our Internal Private Application Subnet. The instances in this subnet are only reachable via HTTP through the internal LB.
B) NAT Gateway public subnet. The NAT Gateway has a specific requirement to sit on a public subnet so it can reach the internet gateway and have a public IP.
C) Agents private subnet. A private subnet allows us to launch load testing agents inside our VPC that can not be reached, but, as you will see, can communicate to Redline13 servers and your internal application.
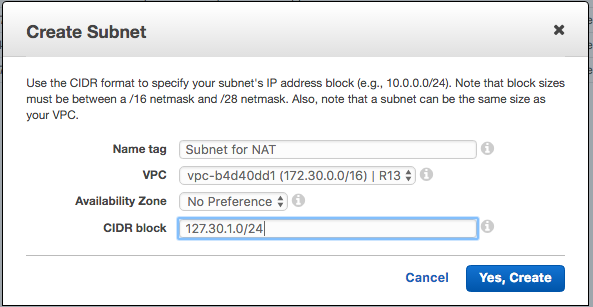
Step 1. Create SubNet for NAT Gateway
- Name your subnet
- Select the VPC
- Enter CIDR Block
We created a SubNet within the same VPC as our internal application and selected the next available internal IP range.
We use the default Route Table, default Network ACL, and the default setting for Auto-Assign Public IP.
Step 2. Create NAT Gateway
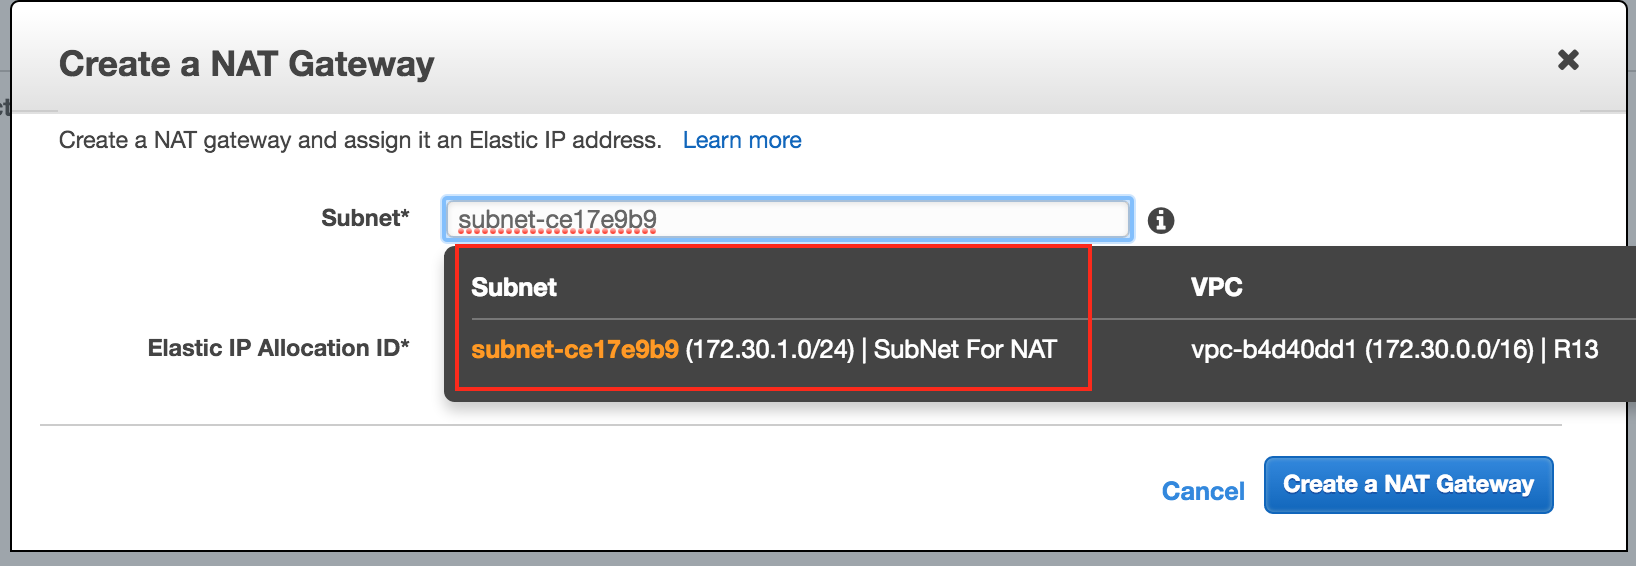
We now make the NAT gateway for the subnet we just created.
- Create the NAT Gateway from https://console.aws.amazon.com/vpc/home?region=us-east-1#NatGateways:sort=desc:natGatewayId
- Select the Subnet just created for NAT
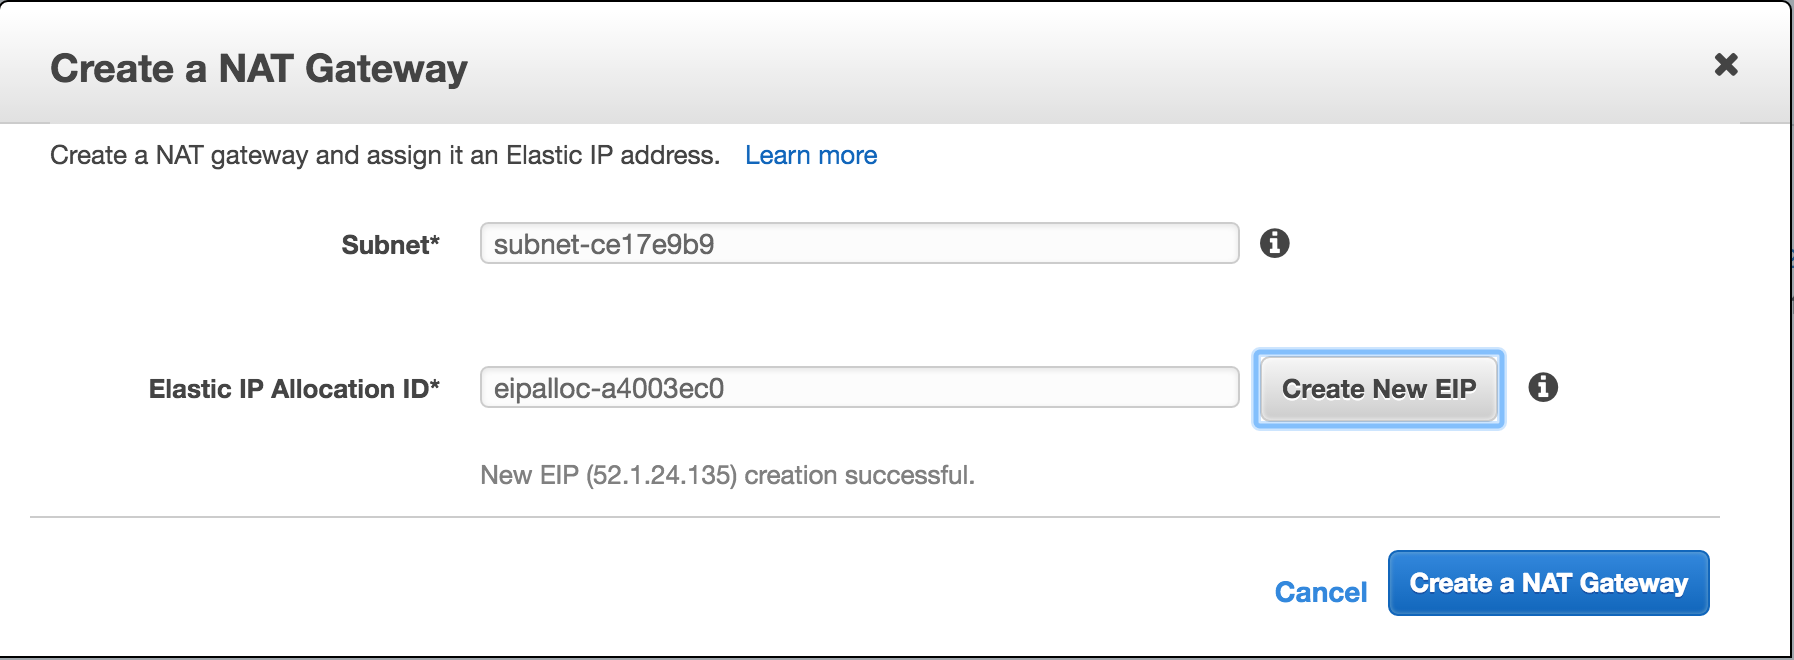
- NAT needs a public IP, and it requires an Elastic IP. “Create New EIP” is the easiest way to do this unless you have one available.
- The NAT Gateway will have an ID when created, and we will need this in a few steps.
Now the NAT gateway is created and should have an External IP address, which will be the IP address the outside world will see for requests routed through the NAT. Using NAT+EIP is an example of how many services flow all external traffic, enabling them to provide a whitelisted IP to third party companies.
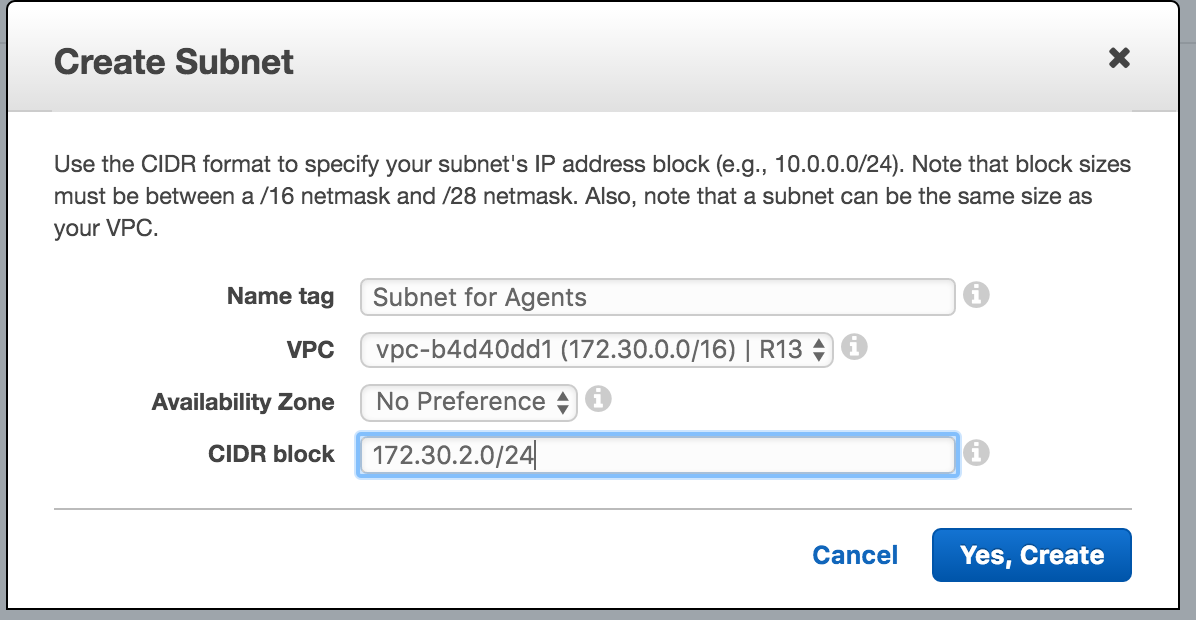
Step 3. Create Agent Subnet
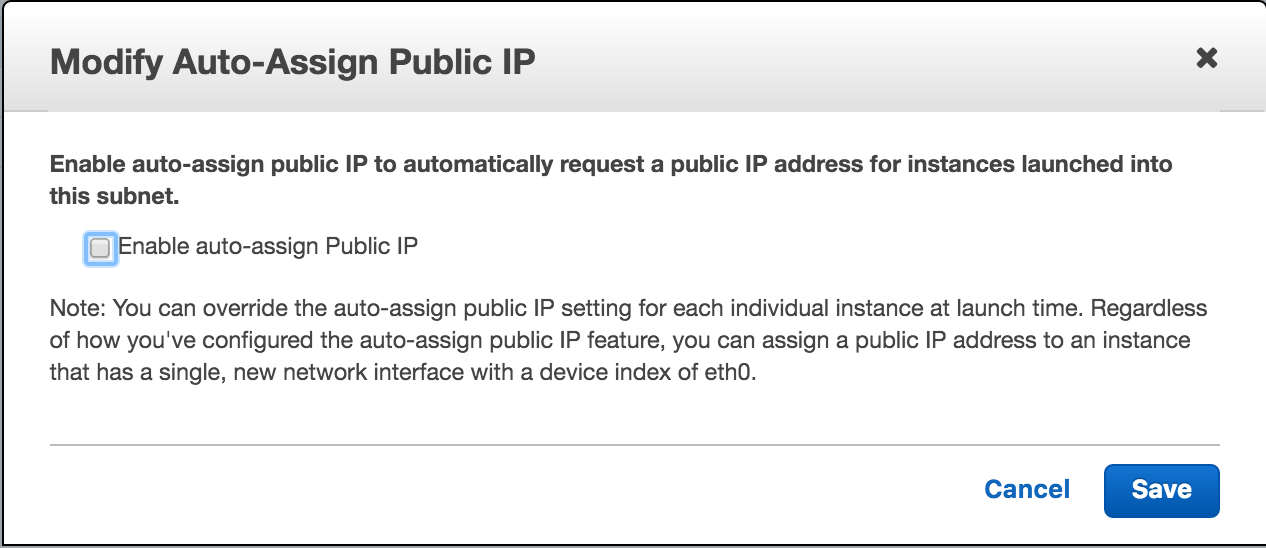
This subnet will be where we send our load testing agents. It is the same as other subnets except we will disable the Auto-Assign Public IP and create a special route table.
A) Create Subnet
B) After it is created, we should also modify the subnet via Subnet Actions and turn off Auto-assign public IP address.
Step 4. Creating RouteTable that can send traffic to NAT Gateway via RouteTable
The default RouteTable allows our NAT to communicate with an internet gateway for external traffic and defines a local route for internal traffic. Let’s take a look at the Default Route Table.
- Go to subnets – https://console.aws.amazon.com/vpc/home?region=us-east-1#subnets:
- Select the Subnet we just created
- Click the “Route Table” tab
- 172.30.0.0/16 routes internal traffic
- 0.0.0.0/0 routes all other traffic to an internet gateway
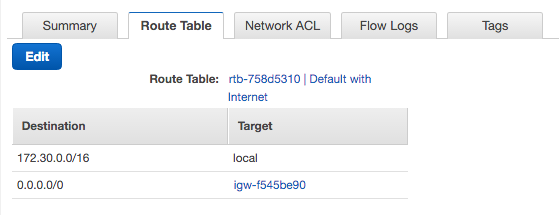
We need a RouteTable which will direct external traffic to our NAT Gateway
Step a – Navigate to routes: https://console.aws.amazon.com/vpc/home?region=us-east-1#routetables:
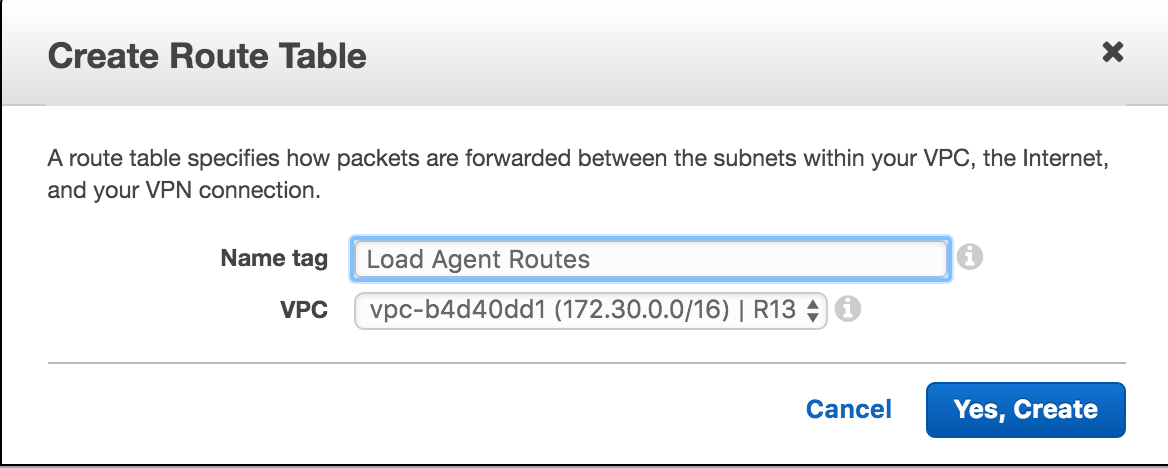
Step b – Create the Route and select your VPC
Step c – Modify the route table which you will likely want two routes
- Keep Local Traffic Local
- Everything else (or specific) sends to the NAT (to go external)
- Specify 0.0.0.0/0 and select your NAT as the target
- If you want just to configure for RedLine13.com, it would be:
- 52.21.10.74/32 as the destination and NAT as the target
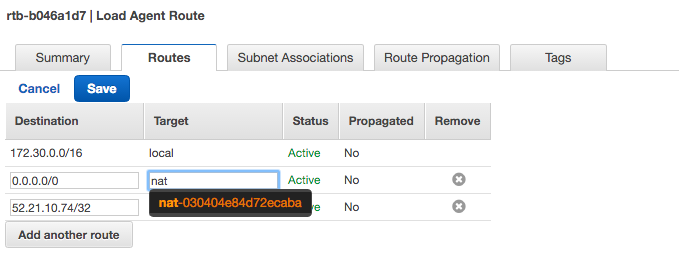
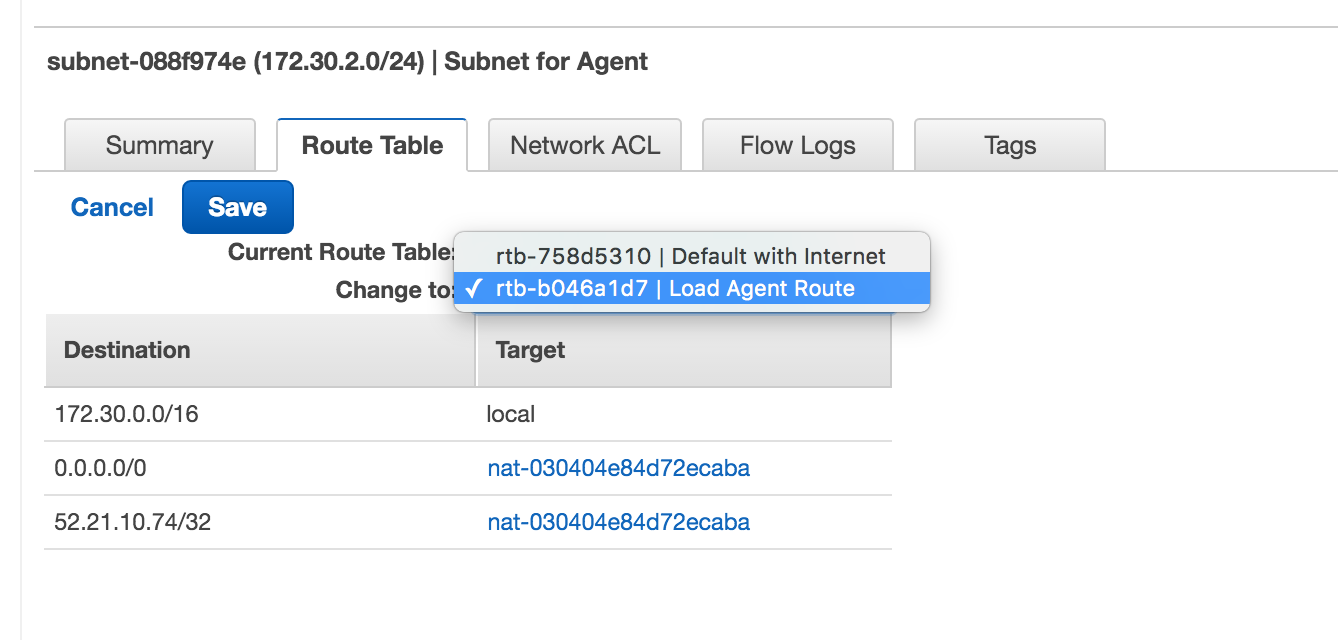
Step 5. Modify Agent Subnet to use the RouteTable from above
With this step, we are establishing traffic patterns for the Agent Subnet.
- Go back to your Agent Subnet
- Select Route Table tab
- Click Edit
- Select the new route table we created
Step 6. Internal ELB needs to allow traffic from our Agent Subnet
Many steps ago we needed to learn about our Application ELB and its security group. We still need to make sure our Application ELB accepts traffic from our new subnet.
- Navigate to ELBs: https://console.aws.amazon.com/ec2/v2/home?region=us-east-1#LoadBalancers:
- Select your internal ELB
- Select the Security Tab
- Select the Security Group
- Select the Inbound Tab
- Click Edit
- Add a Route
- Option 1: You can add everything in your subnet – i.e., 172.30.0.0/16
- Option 2: Just add the specific traffic from the specific subnet – 172.30.2.0/24
- Option 3: Not covered here, but you could also allow instances with another security group.
- This example shows options 1 and 2, though 172.30.0/16 encompasses 172.30.2.0/24
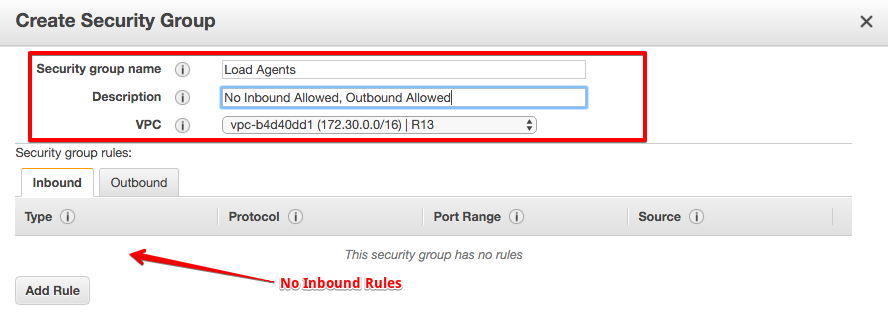
Step 7. Create Limited Agent Security Group
- We can prepare for ourselves a Security group with NO inbound privileges.
- Navigate to Security Groups : https://console.aws.amazon.com/ec2/v2/home?region=us-east-1#SecurityGroups:sort=vpcId
- Click Create
- Remove Any InBound Rules if provided
- Select proper VPC
- Save.
What does our Network Look like?
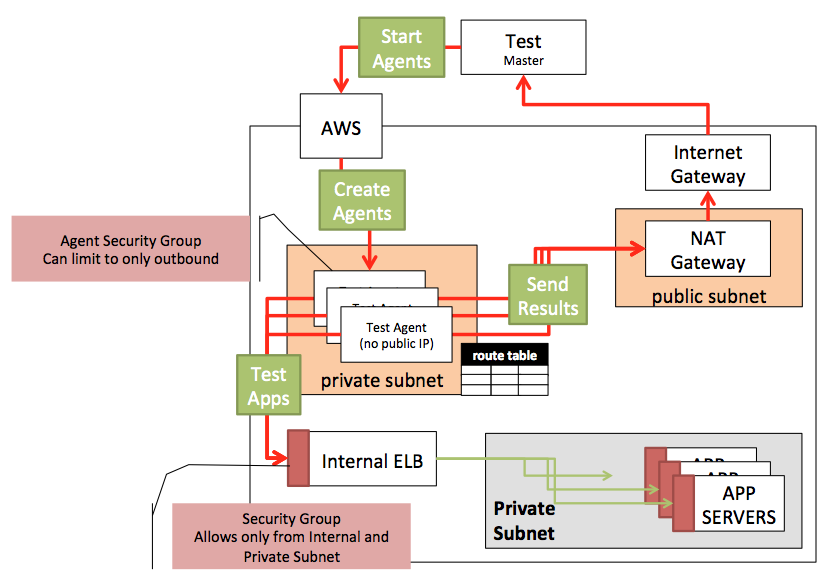
At this point, we are in our optimal setup which keeps us secure, with internal traffic safe from an external source, but allowing agents to talk internally or externally.
- Our Internal ELB Security Group was updated to allow traffic from Agents
- Agents are created in a Private Subnet with no public IP
- NAT can send external traffic out; internal traffic will keep internal IP
- External service has no internal access other than expected HTTP traffic
| Need help to build testing architecture, get in touch with us info@redline13.com or start a subscription. |
|---|
How to test this environment?
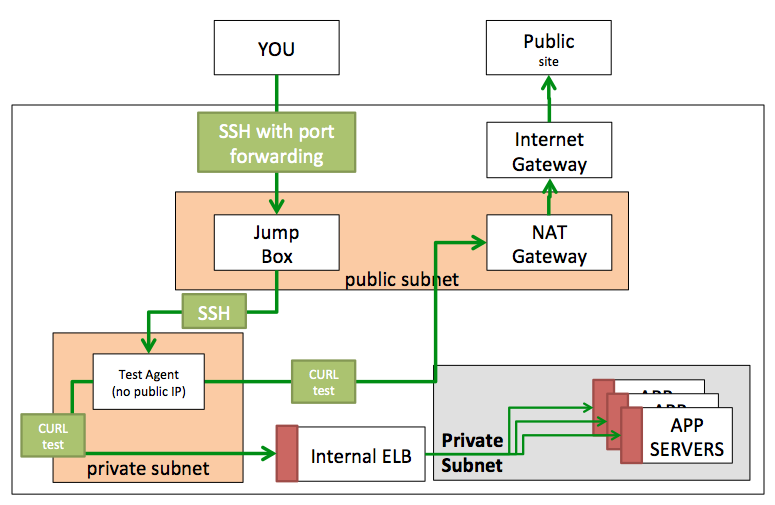
We will need to spin up an instance in our ‘Subnet for Agents’ and determine if it can talk externally and internally. As well, we want to examine the internal route to make sure we are not going external. Here is a diagram of how we will diagnose our environment
1 – Spin up an instance (t2.micro is fine) in Agent Subnet
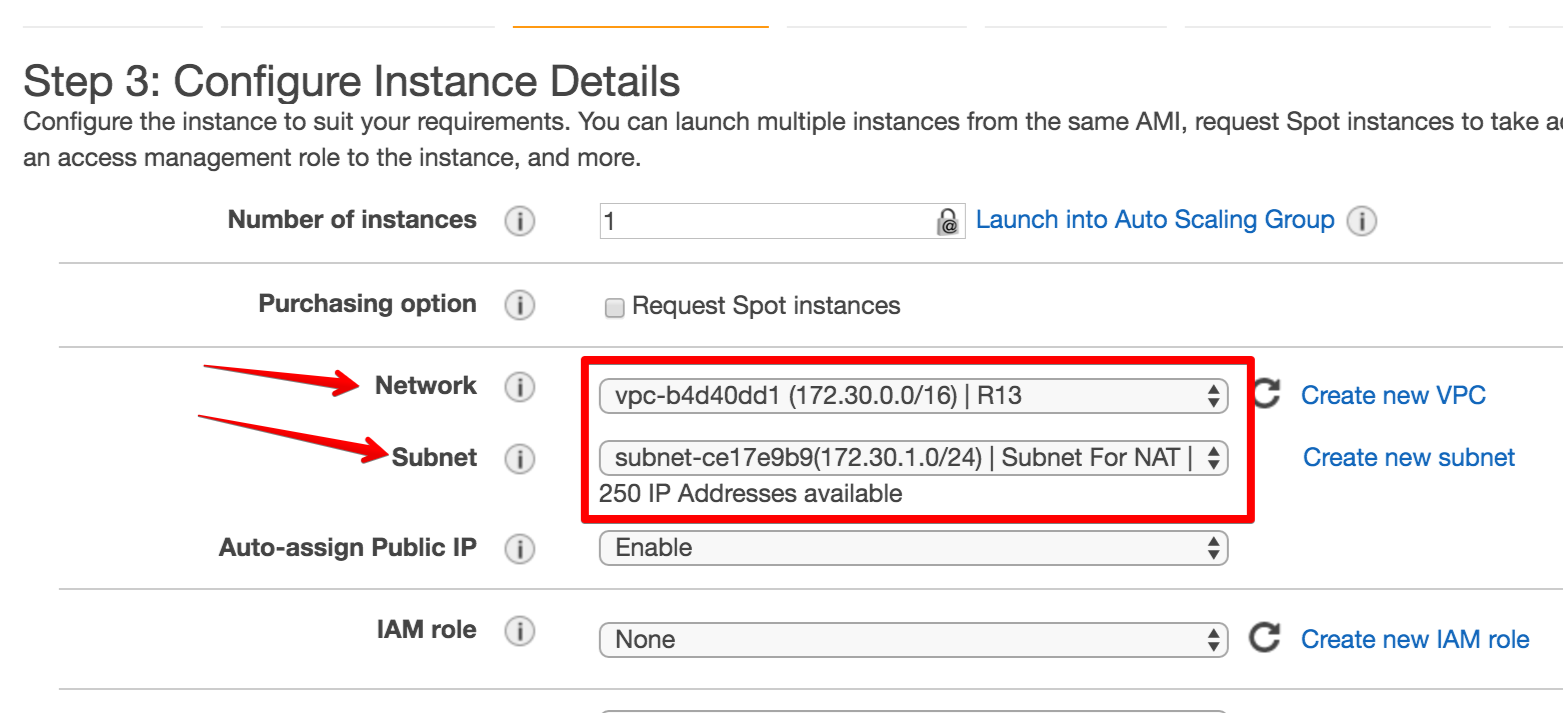
We walk through the EC2 Instance creation using standard Amazon Linux AMI with instance type t2.micro.
- In “Step 3 Configure Instance Details”, make sure to select the proper VPC/subnet.
- In “Step 5 Tag Instance”, we called ours Agent Test
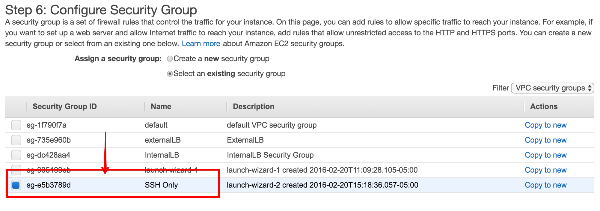
- In “Step 6 Security Group”, we created a new Security group for our test which allows SSH in from anywhere. Though with the rules of this subnet only internal access is available.
- Creating KeyPair – you will need to SSH to this instance to test it. Pick the key pair you will be able to access to SSH to the box.
2 – You need a Jump Box
Our ‘Test Agent’ is on a private subnet with no public IP address. You can not access this box from the outside world, so you must “jump” from another machine – called a jump box. More than likely, you have one already; it would be a public AWS instance you normally SSH into. Assuming this is in the same VPC, you will be good to go. If not, you will need to create another instance on your public subnet. You can use the same subnet you used to create the NAT Gateway.
Once again, create a t2.micro instance, but this time, put it in the NAT subnet and make sure we get a public IP.
- In “Step 3 Configure Instance Details”, make sure to select the proper VPC/subnet.
- In “Step 5 Tag Instance”, we called ours Agent Test
- In “Step 6 Security Group”, we can choose the security group from before as it allows SSH access
- Creating KeyPair – you will need to SSH into this instance to test it. Pick the key pair you will be able to access to SSH to the box.
3 – Prep for running through steps
Get the following information ready
NAT Gateway Private IP: __________ [172.30.1.151]
Jump Box External IP : __________ [52.90.XX.XXX]
TestAgent Internal IP : __________ [172.30.2.75]
Internal ELB URL : ____________ [http://internal-InternalLB-808343934.us-east-1.elb.amazonaws.com]
External URL : _______________ https://www.redline13.com/Service
4 – Testing our setup
We need to enable port forwarding on our key (for linux, windows, mac directions see http://docs.aws.amazon.com/AmazonVPC/latest/UserGuide/vpc-nat-gateway.html#ssh-forwarding-linux).
Note: This test is from OSX
4a – Get to the test agent
ssh-add -K [KEY_FILE]
ssh -A [-iKEY_FILE] ec2-user@[JumpBoxIP]
- The -A parameter is used for key-forwarding

Now from our JumpBox, we should be able to SSH into our test agent, which only has an internal IP
- If you did not use key forwarding in initial SSH, you might need to copy your SSH public key to the jump box.
ssh ec2-user@[TestAgentInternalIP]
You are now on your internal machine!
4b. Confirm Test Agent can reach external endpoints
Can we access redline13.com (or another external URL) and is it going through our NAT gateway?
sudo traceroute -T www.redline13.com
- Your first hop should be to your NAT Gateway IP
- And you should end up at 52.21.10.74 (RedLine13 runs on Amazon)
You can also confirm using CURL to get back a response
curl -v https://www.redline13.com/Service
4c. Confirm Test Agent can reach our internal application endpoints
sudo traceroute -T internal-InternalLB-808343934.us-east-1.elb.amazonaws.com
- Your only hop should be the internal load balancer IP
- The ELB is a dead stop of this TCP traffic
curl -v http://internal-InternalLB-808343934.us-east-1.elb.amazonaws.com/index.html
- The content output will be specific to your application; this is just serving a static page with name agent# so we can see different servers.
| Need to help to build testing architecture, get in touch with us info@redline13.com or start a subscription. |
|---|
Running Load Test from RedLine13
1. CheckList
Internal ELB URL : ______________ [http://internal-InternalLB-808343934.us-east-1.elb.amazonaws.com]
Subnet for Agents : ______________ [subnet-088f974e Subnet for Agents]
Security Group for Agents : ________ [sg-1b37e263 Only for Agents]
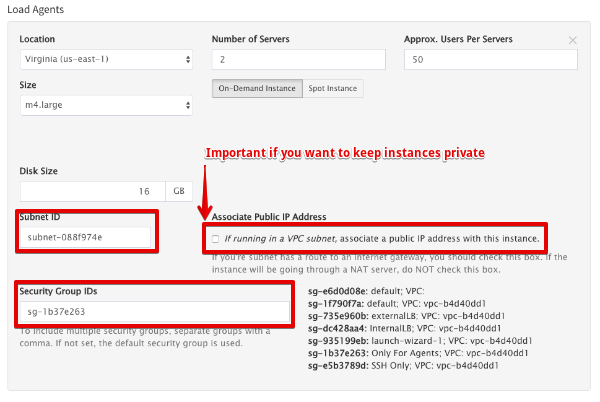
2. Create Test
We can use the RedLine13 Simple Test to validate that all works, after which you can continue with Apache JMeter or Gatling
a. Specify the URL for the internal ELB
b. Expand the Advanced Cloud Options
- Enter Subnet
- Enter Security group
- Uncheck – “associate a public IP address.”
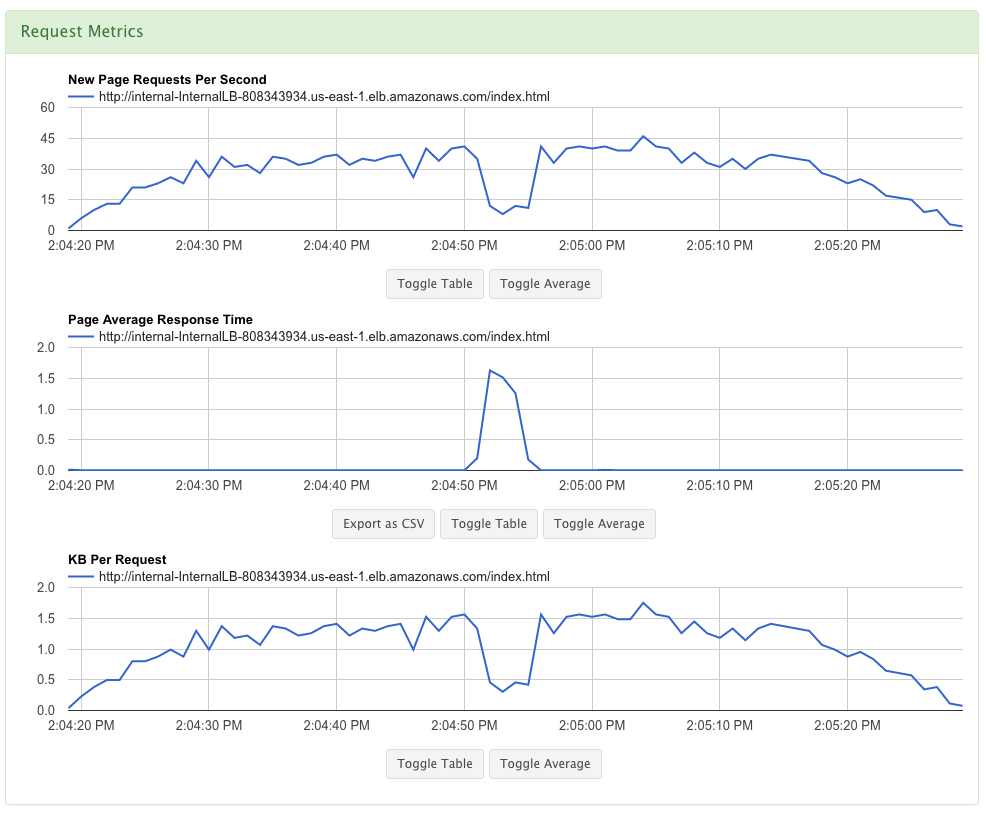
c. Start Test and See Results
- It looks like our t1.micro instance had an issue in the middle of the test.
| Need help to build your testing architecture, get in touch. info@redline13.com or start a subscription. |
|---|
Our Final Architecture and Final Word
The article encapsulates a complete tutorial for running load testing agents that adhere to your security policies and allows testing of internal applications.
- If you made it this far and were not a network engineer, Congrats!
- If you made it this far and had easier ways to solve this, let us know.






1 Comment
Comments are closed.